
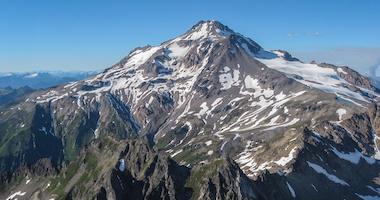


The right gear can make or break your climb on Mount Rainier. Efficient, well-chosen equipment not only enhances comfort and safety, but also allows you to focus on the climb rather than struggling with ill-fitting or ineffective gear.
Note: These gear guides are designed for both independent and guided climbers. If RMI supplies an item on our trips, but is something you would need to consider as an independent climber, it is marked with an (*).
Testing Your Gear
Having the right gear is only part of the equation. Equally important is familiarizing yourself with each item and ensuring everything functions correctly before you set foot on the mountain. We highly recommend acquiring your gear well in advance of your expedition. This allows you to test each piece under various conditions, ensuring it fits well, performs as expected, and meets your comfort needs. Discovering an issue with your equipment while freezing your butt off at 12,000 feet is far from ideal. By thoroughly testing your gear beforehand, you can focus on the climb itself, confident that your equipment won't let you down.
We Simplify Outfitting: The Whittaker Mountaineering Philosophy
Climbers face a dizzying array of choices when it comes to gear. What’s worth investing in? What can you rent? What features actually matter? That’s why Whittaker Mountaineering, in collaboration with RMI Expeditions guides, developed a curated gear selection—highlighting only the best options for Rainier’s unique conditions.
- Tested by Experts: All gear recommendations are RMI guide-approved—designed for real-world performance on Rainier.
- Buy or Rent: Save money by renting high-cost items like boots, crampons, and ice axes instead of buying them outright.
- No Gimmicks, Just Essentials: Every piece of gear is chosen for functionality, reliability, and ease of use in demanding alpine environments.
Check out Whittaker Mountaineering's Rainier Collection.
Mount Rainier Apparel Guide
Everything you need to know about layering on Rainier.
The Layering System: A Proven Approach to Comfort and Protection
Mount Rainier’s weather can shift rapidly, requiring climbers to adjust their layers throughout the climb. A proper layering system consists of a baselayer, insulation, and an outer shell, allowing climbers to manage body temperature and stay dry in changing conditions.

Upper Body Layers
Your upper body layering system should include at least five essential layers, working together to provide warmth, breathability, and weather protection.
Baselayer
This is the foundation of your layering system. While non-hooded or quarter-zip baselayers used to be the norm, the invention of the Sun Hoody pretty made every other option obsolete. Light enough to keep you cool when the sun is beating down on the snowfield, but with full coverage for your arms, neck, head, and hands to avoid sunburn. We recommend going for light colors to avoid overheating on hot days.
Lightweight Insulation
Designed for movement, this layer provides light warmth without sacrificing breathability. Many climbers choose a synthetic fleece or active insulation jacket, which works well during periods of exertion.
Midweight Insulation
When temperatures drop, an additional insulating layer is essential. Options include a thicker fleece, synthetic insulated jacket, or lightweight down piece, depending on preference and weather conditions.
Hardshell
A waterproof and windproof shell is non-negotiable. A lightweight, non-insulated Gore-Tex or similar hardshell with an adjustable hood provides essential protection from snow, wind, and rain.
Expedition Parka
Used during breaks, summit pushes, and emergencies, this is your warmest layer. A high-fill down parka with an insulated hood is ideal for extreme cold and should be roomy enough to fit over all other layers.
Lower Body Layers
The lower body requires fewer layers but must still provide warmth and mobility.
Baselayer Bottoms
Lightweight, moisture-wicking synthetic or merino wool leggings provide added insulation in colder conditions. Some climbers choose to wear only climbing pants in warmer weather.
Climbing Pants
Softshell climbing pants offer the best balance of breathability and weather resistance. Worn alone in milder conditions or over a baselayer in colder temperatures, these pants stretch well and provide freedom of movement.
Hardshell Pants
When conditions demand full protection, Gore-Tex hardshell pants with full-length side zippers allow climbers to layer up quickly without removing boots or crampons.
Gloves & Headwear
Cold fingers and ears can quickly end a climb. Rainier’s environment requires a system of gloves and headwear to maintain warmth while allowing dexterity.
Glove System
- Lightweight gloves for dexterity while setting up camp and handling gear.
- Midweight gloves for climbing in moderate conditions.
- Heavyweight gloves or mittens for summit day and extreme cold. While you might not need these often, they are a key piece of equipment in case of emergency when you might be stuck on the upper mountain for an extended period of time.
The Three Glove System
Like most things in mountaineering, it’s a heck of a lot easier to plan ahead and avoid freezing fingers in the first place than it is to deal with them at elevation. In this case, preparation means having the right gloves, no matter the occasion. First up, you need to be aware of the climb you’re getting into. What are the conditions (i.e. will you be getting wet)? How technical is your climb, and does it require above-average finger dexterity?
While all of this needs to be taken into account, the guides here at RMI Expeditions have been using a 3 glove system for years that works well for most mountaineering. This system consists of lightweight, medium-weight, and heavyweight gloves or mitts. While 3 pairs of gloves for one expedition might sound like overkill, there are really good reasons for having all three, as opposed to a single hybrid or layered glove system.
- Lightweight gloves for dexterity.
- Midweight gloves for climbing in cold conditions.
- Expedition mittens for summit pushes.
Headwear System
- Warm hat for insulation in cold conditions.
- Baseball cap for UV protection at lower elevations.
- Balaclava or buff to shield the face from wind and cold.
Mount Rainier Gear & Hardgoods Guide
From Ice Axes to Trekking Poles, here's what you'll need.
Equipping yourself with the right gear is fundamental to a successful Rainier expedition. Each item on our gear list has been selected based on years of experience and countless expeditions, ensuring it meets the specific demands of the mountain. Proper gear will enhance your safety and overall experience, allowing you to focus on the climb rather than worrying about your equipment. Below, we outline the essential gear you'll need, emphasizing the importance of quality, functionality, and fit.
Backpacks & Sleep Systems
Backpacks
A large, 70+ liter backpack is vital for carrying your gear during the climb. The right backpack will distribute weight evenly and provide ample space for essential items. Look for a robust frame to support the weight of your load, which can include layers, climbing gear, and a portion of group equipment. A comfortable harness system with padded shoulder straps, a hip belt, and an adjustable torso length is essential for comfort and fit. A "tube style" single compartment is better than multiple compartments, while ice axe loops provide secure storage for your ice axes.
Dropdown: Packing Tips for Your Backpack
- Waterproofing: Line the inside of your pack with a trash bag to keep contents dry.
- Weight Distribution: Keep heavier items near your back for balance.
- Accessibility: Store essentials like gloves, snacks, and a headlamp within easy reach, typically in the lid or "brain" of your pack.
- Organization: Since most climbing packs have a single large compartment (along with a "brain" for smaller items), it's important to have your own organization system. We recommend using packing cubes or stuff sacks to organize similar gear.
This backpack will be your companion throughout the expedition, so ensure it fits well and can be adjusted for maximum comfort. If you would like more information on choosing a Mountaineering Backpack, you can check out the blog post over at Whittaker Mountaineering.
Sleeping Systems
Where you sleep determines what you need for insulation. Climbers staying at Camp Muir can use a simple closed-cell foam pad, which is provided by RMI Expeditions. Those camping in tents require a combination of an inflatable pad and a closed-cell pad for warmth and comfort.
Sleeping Bags & Stuff Sacks
Sleeping bags should be rated between 0° and 20°F, with a 0°F bag recommended for colder months (May, June, September) and a 20°F bag suitable for mid-summer conditions (July, August). Look for a sleeping bag with a mummy design that provides excellent insulation while minimizing weight and bulk. A draft collar and hood are essential to trap warmth and protect against the cold. Down insulation offers the best warmth-to-weight ratio, but ensure it has a water-resistant shell or a synthetic option to maintain warmth even when damp.
Down vs Synthetic Insulation
Synthetic Insulation consists of very fine, tightly woven fibers that form small air pockets to trap body heat. They dry quickly and stay warm when wet. Synthetic insulation is best in a wide range of conditions, as synthetic fibers will not absorb moisture.
Down Insulation is a natural insulation and the most packable of the insulation types. Goose or duck down plumes provide warmth by trapping body heat within the space between down clusters that insulate the garment. Down is best in cold climates and where less weight is optimal, as the warmth-to-weight ratio is the highest. Note: There are new treatments that some manufacturers use that prevent the down clusters from collapsing when wet, therefore helping them maintain warmth even in the presence of moisture.
Use a compression sack for your sleeping bag to optimize space in your backpack. A compression sack with durable fabric and strong stitching will withstand the pressure of reducing the sleeping bag's volume. Choose one that is water-resistant to protect your sleeping bag from moisture, keeping it dry and functional in wet conditions. Compressing your sleeping bag significantly reduces its size, allowing more room for other essential gear in your pack. Ensure the compression sack is large enough to handle the bulk of your sleeping bag but compact enough to fit easily in your pack.
Inflatable Sleeping Pad*
An inflatable sleeping pad provides crucial insulation and comfort, separating you from the cold ground. Look for a full-length pad that covers your entire body, ensuring maximum warmth. A high R-value indicates better insulation, which is essential for cold-weather camping. Choose a lightweight pad that is easy to inflate and made of durable material that can withstand rough surfaces. Test the pad before your trip to ensure it holds air throughout the night and packs down small enough to fit in your backpack.
If you're planning on sleeping in cold temps, consider going with a two-pad system - a super packable blow-up pad and a closed cell foam cell. When you use two pads together, their R-values effectively add up, and it’s hard to get much more insulated than that! We recommend the Therm-a-Rest NeoAir XLite for a blowup pad and the Exped FlexMat as a closed-cell pad. Plus, your closed cell pad can be used to sit or stand on when you’re outside your tent, insulating you from the snow!
Closed Cell Foam Sleeping Pad*
In addition to an inflatable sleeping pad, a closed-cell foam pad adds an extra layer of insulation and protection from the cold ground. These pads are lightweight, durable, and provide a reliable barrier against the elements. They can be used with an inflatable pad for added warmth and comfort or on their own in milder conditions. A foam pad can also be a backup if your inflatable pad fails. Choosing a foam pad that is easy to roll up and pack is essential, ensuring it fits neatly in or on your backpack.
R-Values
The level of insulation a sleeping pad provides is called its R-value. R-values signify how well a material resists heat conduction, so the higher the R-value, the better the resistance, and the less heat gets transferred from your warm body to the cold ground. Sleeping pad values usually range from 1-7, and for cold camping, we recommend you find one with an R-value of at least 5.
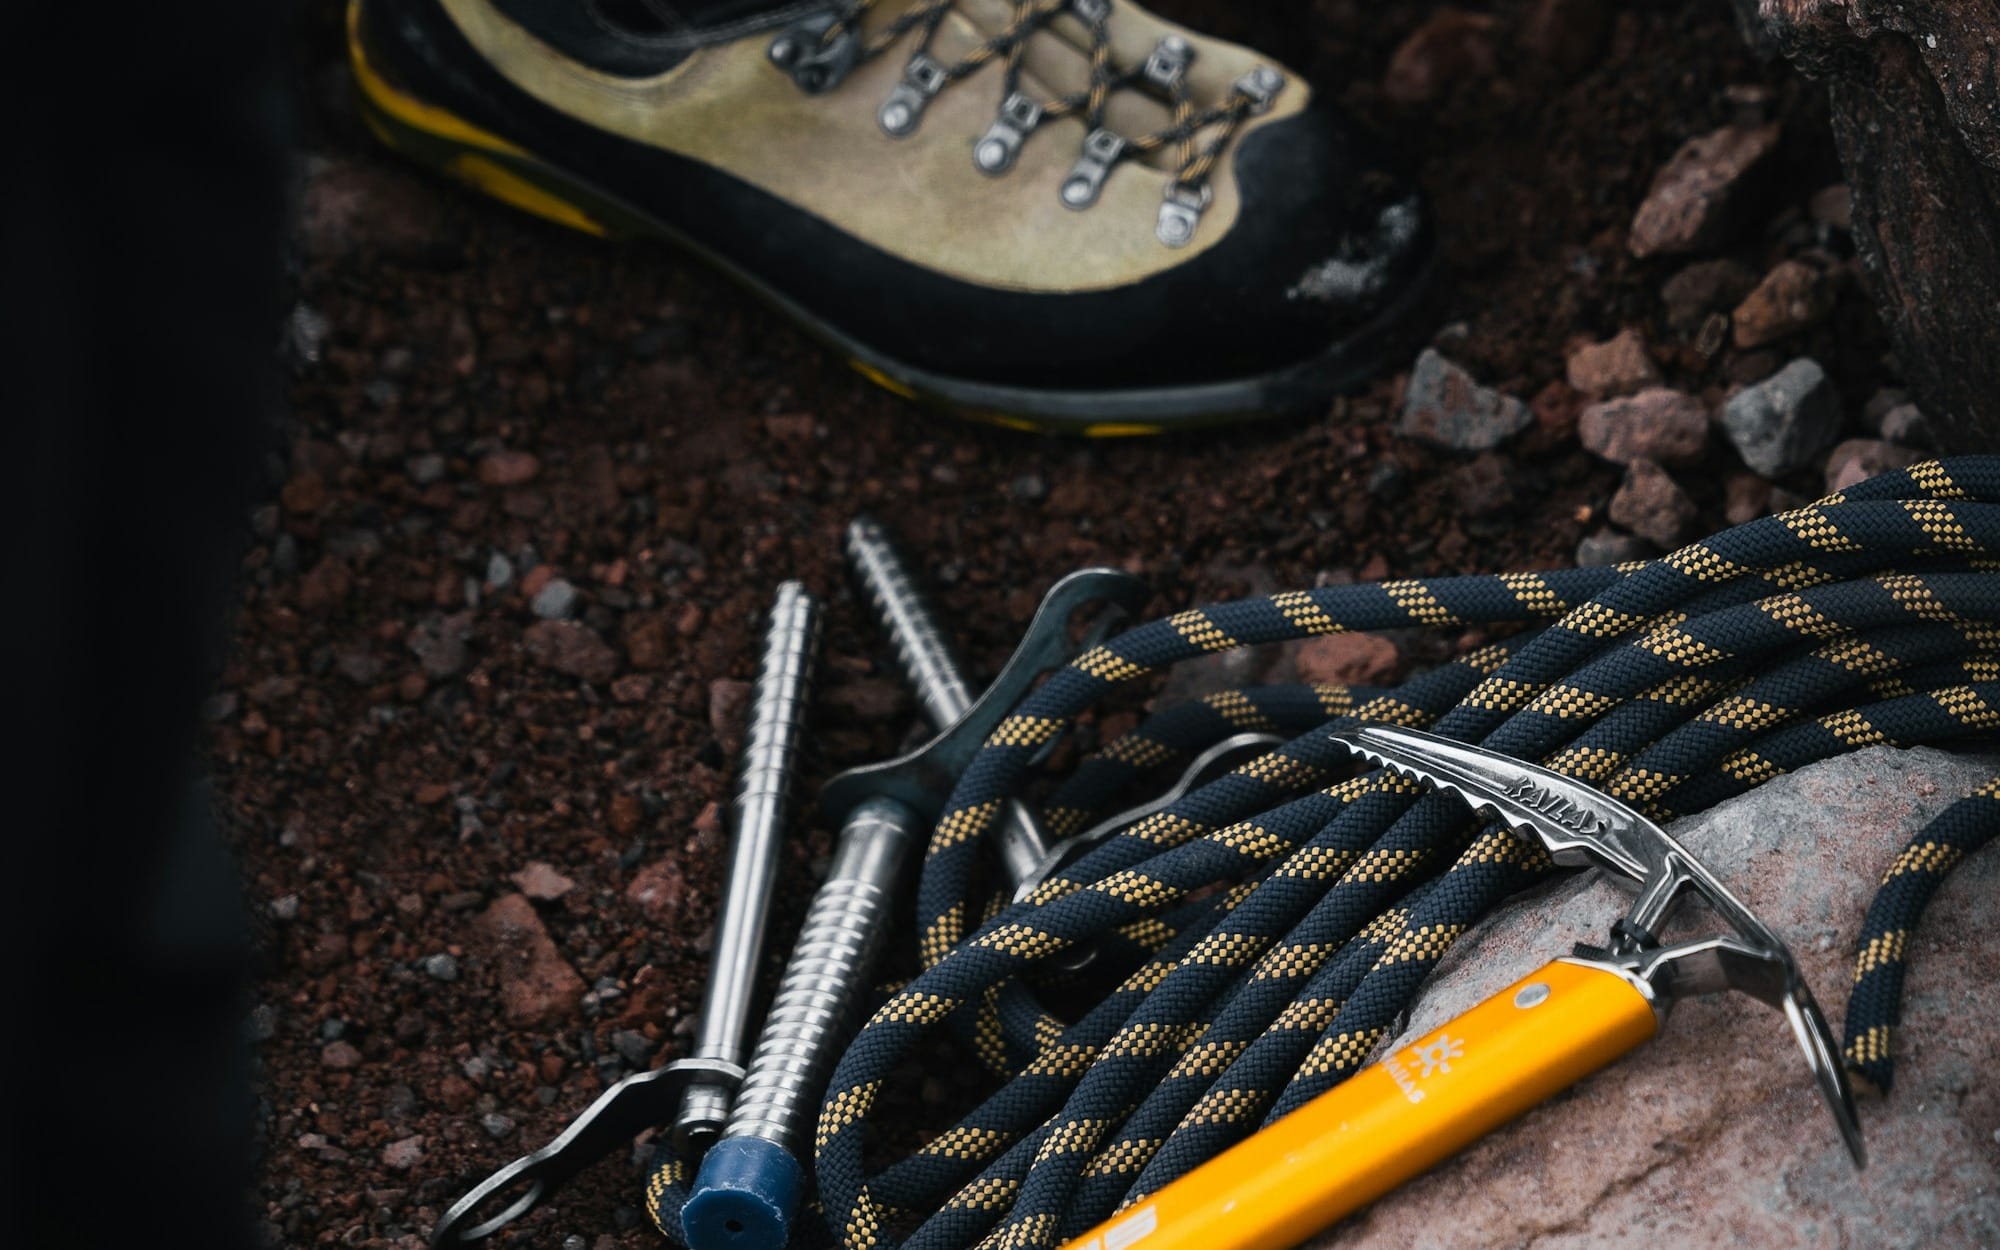
Ice Axes, Crampons & Traction Tools
Ice Axes
Mount Rainier’s standard routes require a classic mountaineering ice axe rather than a technical model. The axe provides a third point of balance on steep slopes and is essential for self-arrest in the event of a slip.
However, if you're planning on tackling a more technical route like the Kautz, you'll need a dedicated Ice Tool with a shorter, more curved shaft and a more aggressive pick, which is better suited to ice climbing.
Choosing the Right Ice Axe:
- Size: Up to 5’8” → 65 cm | 5’8” to 6’2” → 70 cm | 6’2”+ → 75 cm
- Leash: Avoid wrist leashes, as they get in the way on switchbacks.
- Usage: Ice axes are primarily used above Camp Muir—trekking poles are preferred on the lower mountain.


For general mountaineering, climbers who are 5'8" or less should select an axe between 50cm-65cm. For those who are between 5'8" and 6'2" a 65cm-70cm axe is a good choice. Anyone over 6'2" will want to consider an axe in the 70cm-75cm range. Proper length can be further determined by holding the axe by its head with your shoulders square. The spike of the axe should come to the ankle bone or a bit above. An ice axe for general mountaineering should not be so long that it is used as a trekking pole. If you are between sizes, go for the shorter option.
For a detailed guide on picking an ice axe, check out Whittaker Mountaineering’s Ice Axe Guide.
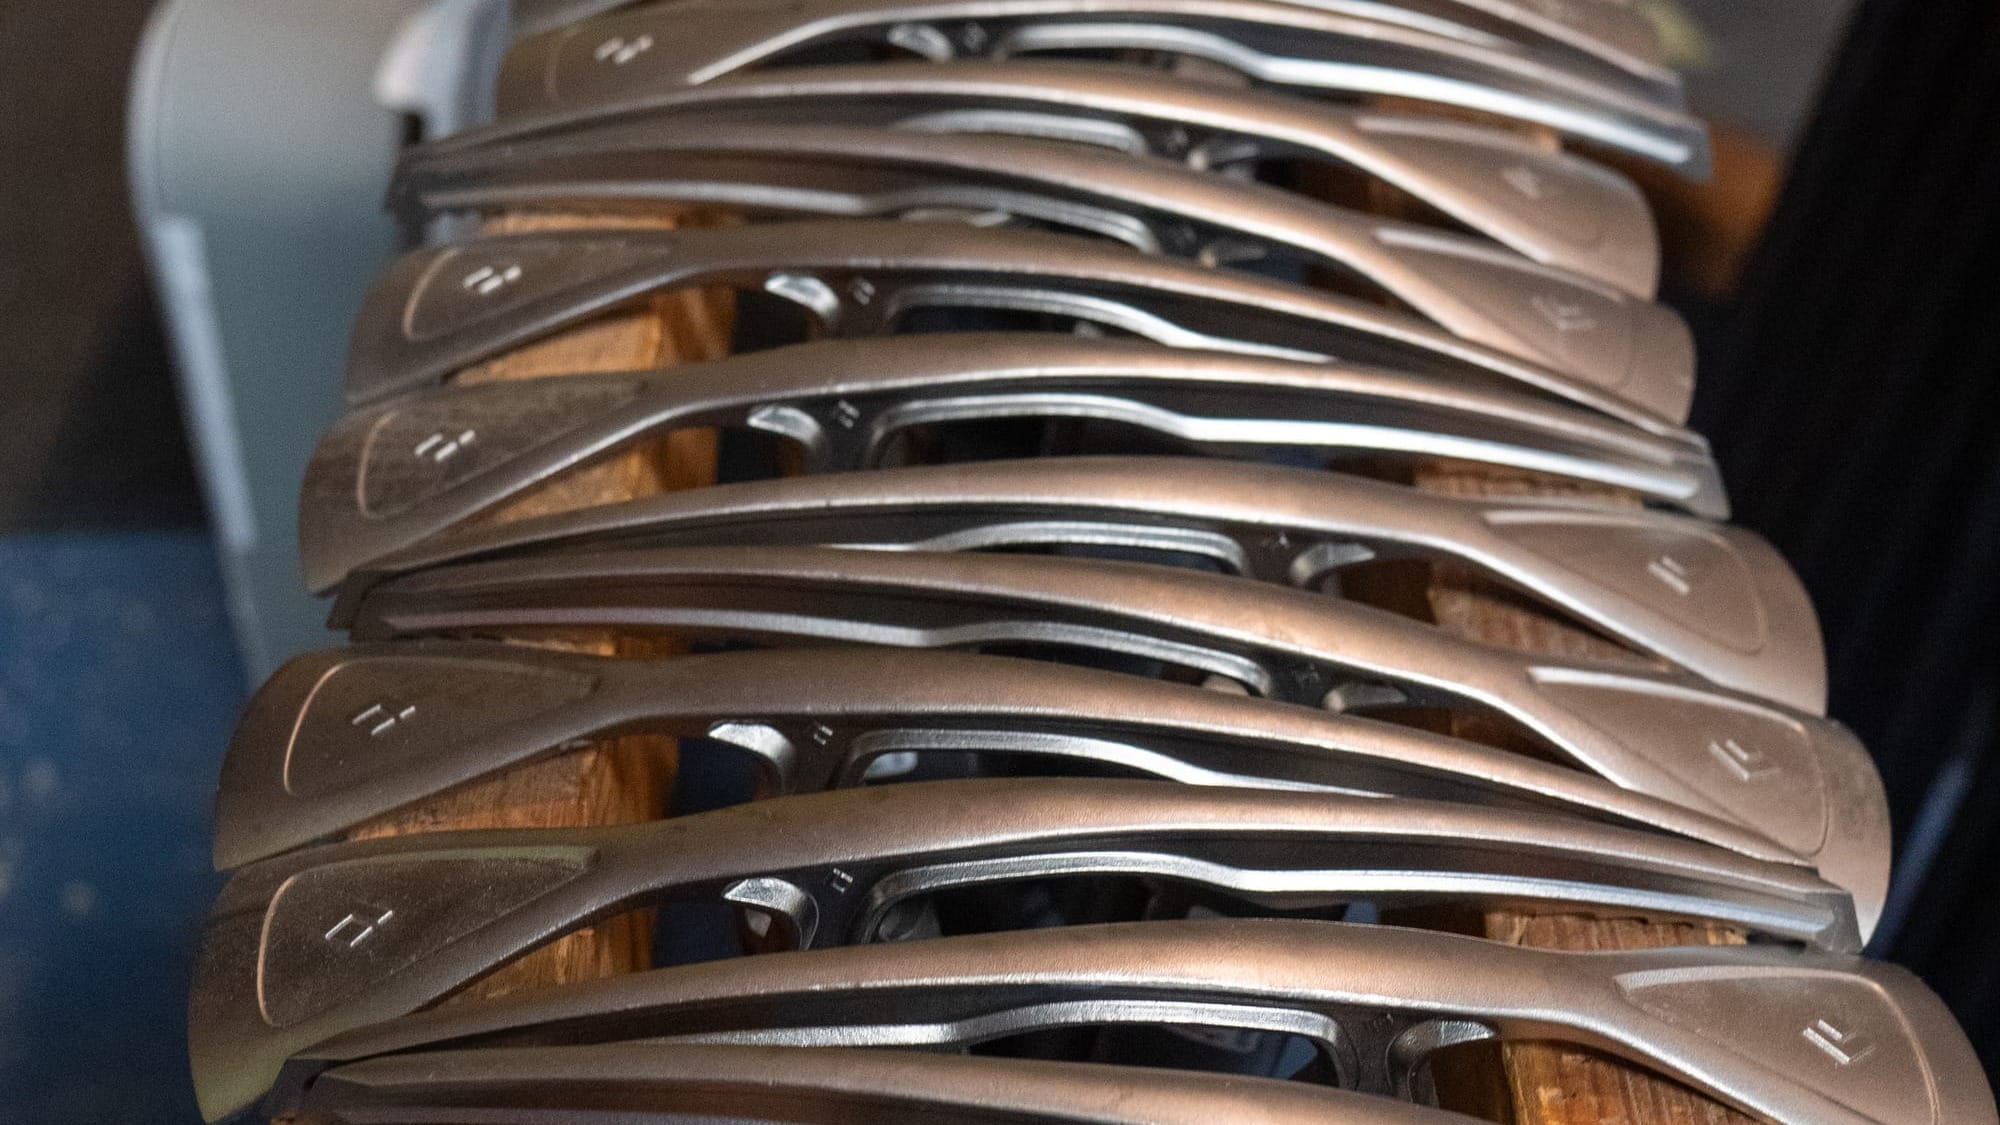
Crampons
Crampons are vital for maintaining traction on ice and snow. Select crampons that securely fit your boots and offer adjustable settings to adapt to different terrains. Twelve-point crampons are ideal for the mixed conditions on Rainier, providing stability on both ice and snow. Make sure the points are sharp and the bindings are in excellent condition. High-quality crampons will ensure you can navigate icy surfaces safely, enhancing your climbing efficiency.
Once again, while a general mountaineering crampon is ideal for most routes on Rainier, some more technical routes require a more aggressive crampon.
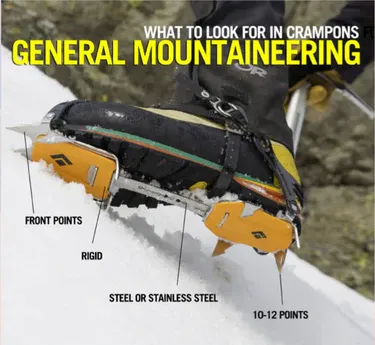
Proper fit is crucial. The sole of your boot should sit snugly on the crampon frame, with the toe and heel bails securely locking in place to minimize movement. Crampons are left- and right-foot specific, with buckles designed to be positioned on the outside of your ankle.
Crampon Sizing
In general, crampons can be adjusted to match your boot size by using a bar system. Climbers with bigger feet (size 11 boots or larger) should go with 12-point crampons. The 12-point crampon has a longer toe-piece, therefore allowing for more distribution of points of contact throughout the sole of the boot. You will also need the longer extender bars, which are available for most crampons.
- Check Buckle Placement: Should always be on the outside of the ankle.
- Secure Toe & Heel Bails: No significant movement when walking.
- Trim Excess Straps: Prevent snagging while walking.
Harnesses, Carabiners & Crevassue Rescue
Harnesses
Rainier’s glacier travel requires an alpine climbing harness, which differs from a traditional rock-climbing harness. Since climbers spend more time walking than hanging, alpine harnesses are lighter, less padded, and allow better range of motion.
Look for models with adjustable leg loops to accommodate different layering systems. Features like drop seats or fully adjustable waist belts make it easier to manage clothing layers throughout the climb. Ensure your harness fits well and is comfortable to wear for extended periods, as it will be an integral part of your gear throughout the expedition. Practice putting it on while wearing gloves and multiple layers to ensure ease of use in cold conditions.
Carabiners
Carabiners are essential for various climbing tasks, from securing ropes to creating anchors. Depending on your route, and whether you’re climbing with RMI Expeditions or independently, your carabiner needs will differ. For example, if you’re climbing with RMI Expeditions on a standard 4 Day Summit Climb, all you need is 1 locking carabiner, which is provided along with your harness if you choose to rent from Whittaker Mountaineering.
Carabiner Callouts
For independent climbers or climbers on more technical routes, your carabiner needs may look something like this:
- Triple Action Locking Carabiner: This carabiner is used for clipping into the climbing rope. Its triple-locking mechanism provides extra security.
- 1 Locking Carabiners: These are used for clipping into anchors and other critical points where additional security is necessary. Choose lightweight but strong carabiners with a smooth gate action.
- 3 Non-Locking Carabiners: These versatile tools are used for various tasks, such as packing ditch loops and attaching gear. Ensure they are durable and easy to operate with gloves on.
Familiarize yourself with the operation of each carabiner type and practice using them in different scenarios to ensure smooth and efficient handling during your climb.
Crevasse Rescue Kit
If you're planning on climbing independently, or are going to be training with RMI Expeditions on an Expeditions Skills Seminar, you'll need a crevasse rescue kit. A crevasse rescue kit is essential for safely navigating and responding to emergencies on the glacier. Your kit should include:
- Pickets or other Anchors*: Pickets or other anchor devices are essential for setting up secure crevasse rescue systems on Rainier. These tools provide reliable anchor points in snow and ice, allowing climbers to safely haul teammates out of crevasses or secure themselves in case of a fall. Make sure to carry several pickets or other anchor devices and practice using them in various snow conditions to ensure proficiency during emergencies.
- Double- and Single-Length Sewn Nylon Slings: These are used for setting up anchors and other rescue setups. They provide versatility in creating secure points for rescue operations.
- Accessory Cord: This is a high-quality, durable cord for constructing prusiks and other essential knots. It is crucial for building efficient and effective rescue systems.
- Carabiners: Locking and non-locking carabiners are vital for securing ropes and equipment. Locking carabiners provide added security for critical connections, while non-locking carabiners offer versatility for general use. A minimal crevasse rescue kit should include one triple-action carabiner, two locking carabiners, and one non-locking carabiner.
- Prusik, Butterfly, and Münter Hitch Knots: Familiarize yourself with these knots and practice them regularly to ensure proficiency in crevasse rescue situations. Knowing these knots allows you to create secure connections and manage loads effectively.
- Micro Traxion and Tiblock: While not strictly necessary, a Micro Traxion and Tiblock will make your rescue systems significantly more efficient than prusik hitches for each pulley.
Regular practice with your crevasse rescue kit components is crucial to ensure proficiency and confidence in rescue scenarios. This equipment is vital for team safety and effective response to emergencies on the glacier.
Climbing rope*
A high-quality climbing rope is vital for any group traveling across Rainier's glaciers. On guided RMI climbs, we use a 50m rope, but you may opt for a shorter one. Dry treatment helps prevent the rope from absorbing moisture, which can add weight and freeze in cold conditions. The diameter of the rope should balance between durability and weight, typically around 8-9mm for glacier travel. Ensure your rope is in excellent condition, free from any damage or excessive wear. Regularly inspect and practice using your rope in various scenarios to ensure you are comfortable with its handling and performance.
If you're unsure how
Avalanche Safety
If you're climbing with an RMI Expeditions program, all you'll need to bring is an Avalanche Transceiver, as your guides will have shovels and probes.
Transceiver
Safety on Rainier’s slopes requires an avalanche transceiver. Choose a modern, digital transceiver with multiple antennas for accurate and fast search capabilities. Ensure it has fresh batteries and carry spares. Use your transceiver regularly to become proficient in search and rescue techniques, as this can be a lifesaver in emergencies. Familiarize yourself with the device’s functions and practice searches in various scenarios to improve your response time.
Avalanche Shovel*
An avalanche shovel is critical for various tasks, including digging out tent platforms, constructing snow walls for wind protection, and performing avalanche rescue. Choose a lightweight yet durable shovel with a sturdy metal blade. A telescoping handle is beneficial, offering a compact size for storage and ease of use when extended. The shovel should also be comfortable to grip, even with gloves on, and capable of moving snow efficiently. The ability to quickly and effectively shovel snow can be crucial in routine and emergencies, making the avalanche shovel an indispensable part of your gear.
Avalanche Probe*
In the event of an avalanche, an avalanche probe is used to locate buried team members quickly and accurately. Select a lightweight probe that is easily extendable to at least 240 cm. It should be made of durable materials like aluminum or carbon fiber and feature a quick-locking mechanism for fast deployment. The probe should also have clear markings to measure depth, aiding the rescue process. Regular practice with your avalanche probe is essential to deploy and use it efficiently under stress. Having a reliable probe as part of your gear can significantly improve the chances of a successful rescue.
Head Gear: Helmets, Glacier Glasses, Goggles & Headlamps
Helmets
A climbing helmet is crucial for protecting your head from falling ice, rocks, and impacts during a fall. Choose a lightweight helmet for comfort over long periods, well-ventilated to keep you cool during strenuous activity, and adjustable to ensure a secure and comfortable fit over various layers of headgear. Durability is critical, as the helmet needs to provide reliable protection in harsh conditions.
Proper fit is key—your helmet should be snug but comfortable with and without a hat. It should sit just above your eyebrows and remain secure without excessive pressure.
How to Fit a Climbing Helmet
- Adjust Straps for a Snug Fit: The helmet should not slide forward or backward.
- Check Side Protection: The helmet should cover the sides of your head adequately.
- Comfort Test: Wear it with a hat or buff to ensure a good fit in cold conditions.
Glacier Glasses & Goggles
Glacier glasses provide full UV protection against the intense sunlight and reflection off the snow. Look for models with dark lenses (6% visible light transmission) and side shields to prevent glare. A wraparound design provides maximum coverage and protection from reflective glare, while an anti-fog coating ensures clear vision in varying conditions. Durable frames that can withstand cold temperatures and rough handling are also important. Choose glasses that fit comfortably and stay secure during physical activity, and always carry a spare pair in case of damage or loss. For more info on glacier glasses and goggles, check out the gear post at our retail partner, Whittaker Mountaineering.
Goggles are used in high winds and storms. Key features include a dual-lens system that reduces fogging and provides clear vision, adjustable straps to ensure a secure fit over your helmet, and good ventilation to prevent fogging. High UV protection is also essential to shield your eyes from harmful radiation. Ensure your goggles fit well with your helmet and other headgear and are comfortable and functional in various conditions.
Headlamps
A headlamp with a bright beam is essential for the pre-dawn summit push. Most modern headlamps use LED bulbs for efficiency—always carry extra batteries to avoid running out of power mid-climb.
Cooking & Camping
Cooking & Camping for Independent Climbers
If you're on an RMI Expeditions Rainier program, you don't need to worry about bringing any of these items. However, if you're climbing independently and don't plan to stay in the shelter at Camp Muir, you'll need to bring all the following items. Please be hyper-vigilant about Leave No Trace principles when cooking and camping on Rainier's glaciers.
Tent*
A high-quality, four-season tent is essential for protection against the harsh conditions on Rainier. When selecting a tent, prioritize durability to withstand high winds, heavy snow, and low temperatures. The tent should offer ample space for you and your gear, with a two-person tent typically recommended for comfort. Additionally, it should be easy to set up quickly, even in severe weather, and feature good ventilation to reduce condensation inside. Ensuring your tent is in excellent condition and practicing setting it up in various conditions will help you become proficient and efficient in its use. For more info on what to look for in a four-season tent, check out the post at Whittaker Mountaineering.
Stove*
A reliable stove is crucial for melting snow for water and cooking meals at high altitudes. Choose a durable and reliable stove that performs well in extreme cold and windy conditions. Fuel efficiency is important, as carrying extra fuel adds weight, so consider a model that conserves fuel. The stove should also be easy to operate, even with gloves on. Common choices include liquid fuel stoves or high-output canister stoves designed for cold weather use. Your stove is essential for making sure it functions properly when needed.
Cooking Equipment*
Cooking equipment should be lightweight yet robust enough to handle the demands of high-altitude cooking. Necessary items include:
- Pots and Pans: Made from lightweight materials like titanium or hard-anodized aluminum.
- Utensils: Lightweight, durable, and heat-resistant. Consider multi-purpose tools to save space.
- Windshield: To improve stove efficiency in windy conditions.
- Lighter and Matches: Waterproof and stored in a secure, dry place.
Ensure all your cooking equipment is in good working order and practice using it to streamline meal preparation.
Mount Rainier Footwear Guide
Mountaineering Boots, Approach Shoes, Gaiters, and More
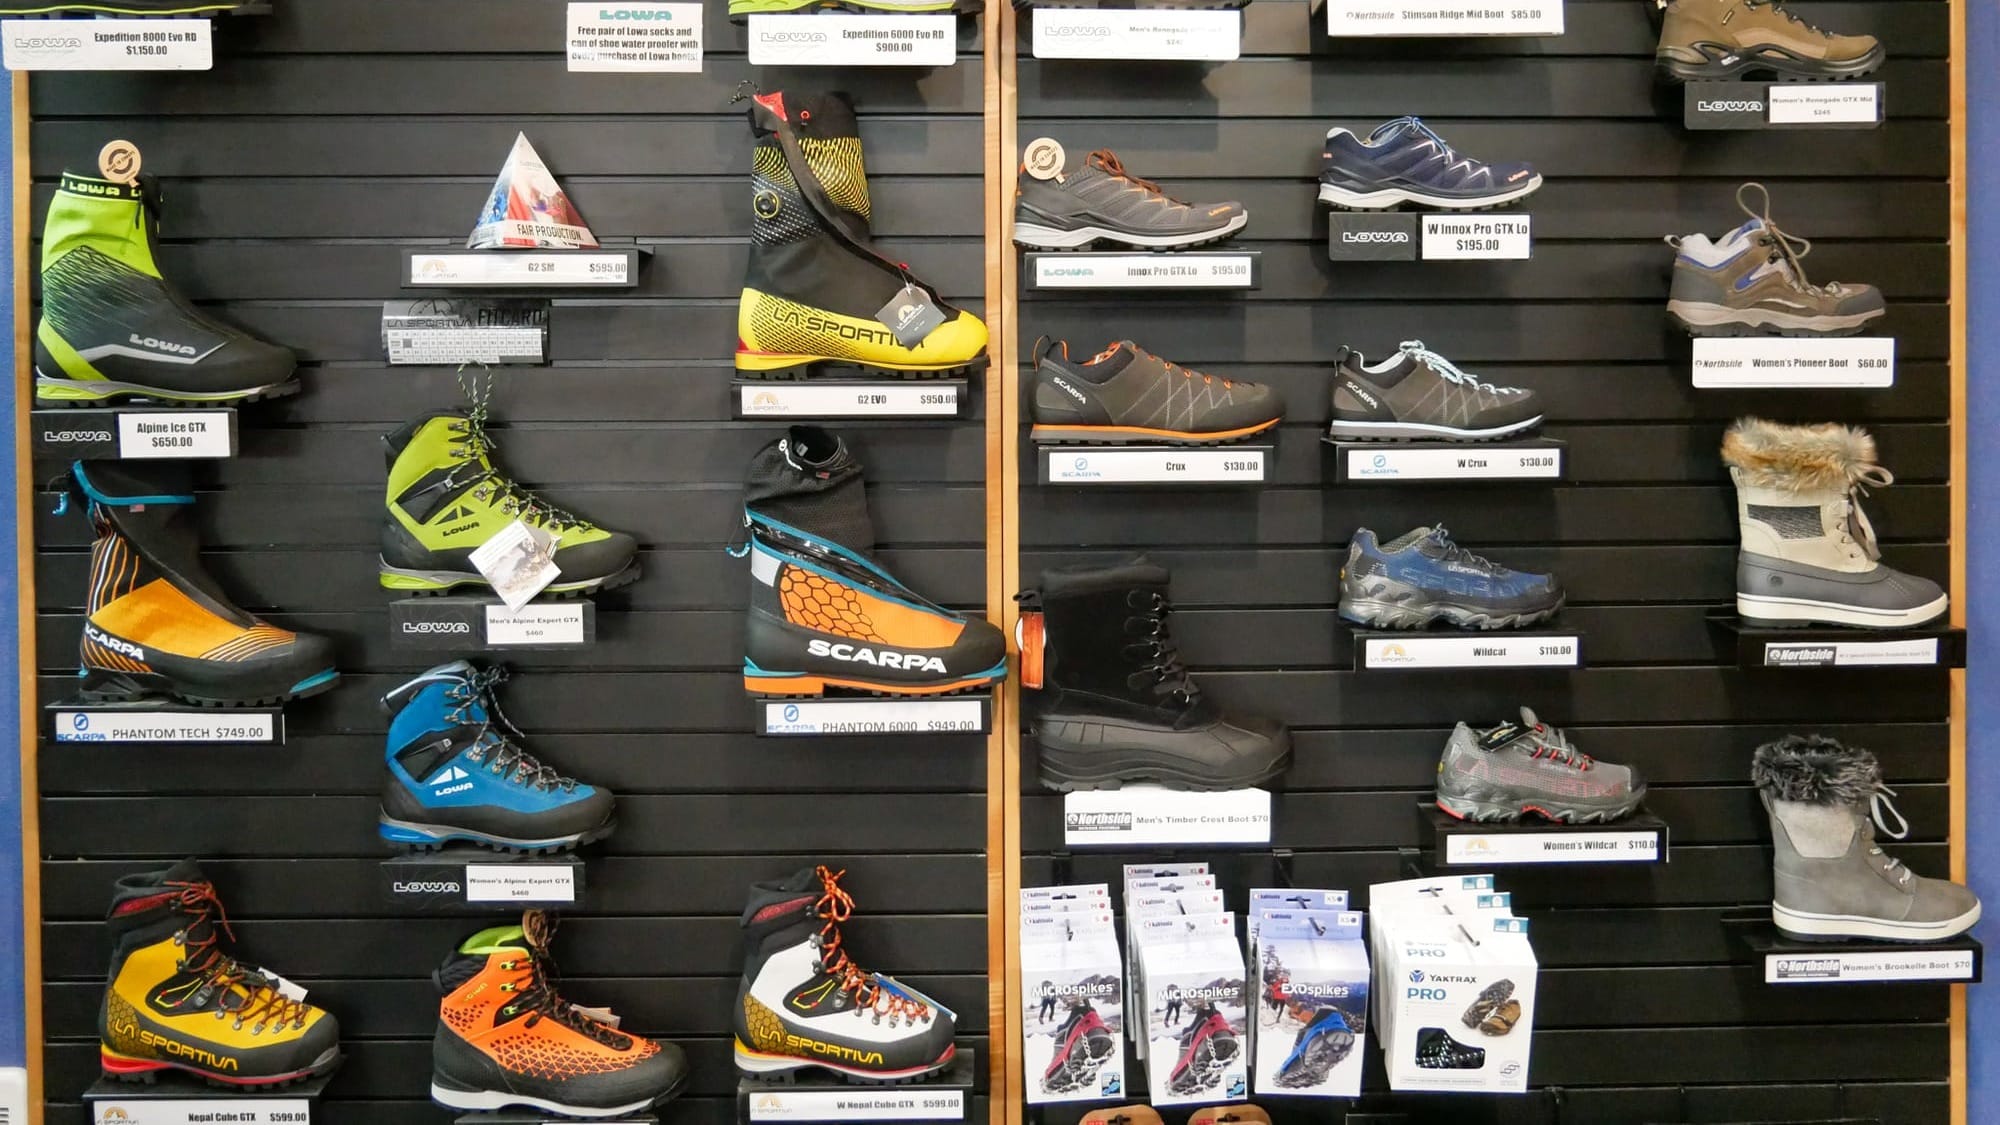
Mountaineering Boots
Mountaineering boots provide insulation, stability, and compatibility with crampons, making them essential for navigating Rainier’s glaciers. Climbers can choose between single or double boots, depending on the season and expected temperatures. If you're looking for a detailed breakdown on how to choose the right mountaineering boots, check out the blog post over at Whittaker Mountaineering.
Single vs. Double Boots
Single Boots: Designed for mid-summer climbs (July/August) when freezing levels are typically above 10,000 feet. These boots are insulated, rigid-soled, and crampon-compatible, making them lighter and more comfortable than double boots.
Double Boots: Recommended for early-season (April-June) and late-season (September) climbs when freezing levels are below 10,000 feet. Double boots feature a removable insulated liner, which helps retain warmth and allows for faster drying between climbs. These boots provide superior warmth in colder conditions.
Renting is best for first-time climbers or those unsure if they’ll need the boots for future trips.Buying is best if you plan to continue mountaineering and want boots that fit perfectly for multiple trips.
Approach Shoes
During the summer months, much of the trail to Camp Muir is snow-free. Approach shoes or lightweight hiking boots provide a more comfortable option for hiking the lower sections before switching to mountaineering boots.
A good approach shoe should be lightweight, breathable, and have a durable, high-traction sole. These shoes also serve as camp shoes when resting between climbs.
Gaiters
Gaiters protect your lower legs and boots from snow, ice, and moisture, preventing unnecessary exposure to the elements. They also reduce the risk of catching crampons on loose clothing.
Socks
A proper sock system is crucial for preventing blisters and maintaining warmth. Climbers typically wear either a single medium-weight sock or a combination of a liner sock and a heavier sock, depending on preference.
When selecting socks, avoid cotton, which retains moisture and causes cold feet. Instead, choose merino wool or synthetic socks designed for moisture-wicking and insulation.
Miscellaneous Gear for Rainier
First Aid, Toiletries, Entertainment, and More
Several miscellaneous items beyond your essential gear and apparel can greatly improve your comfort, efficiency, and safety on Mount Rainier. These personal and technical items help with hydration, organization, emergency preparedness, and overall expedition enjoyment.
First Aid & Emergency Equipment
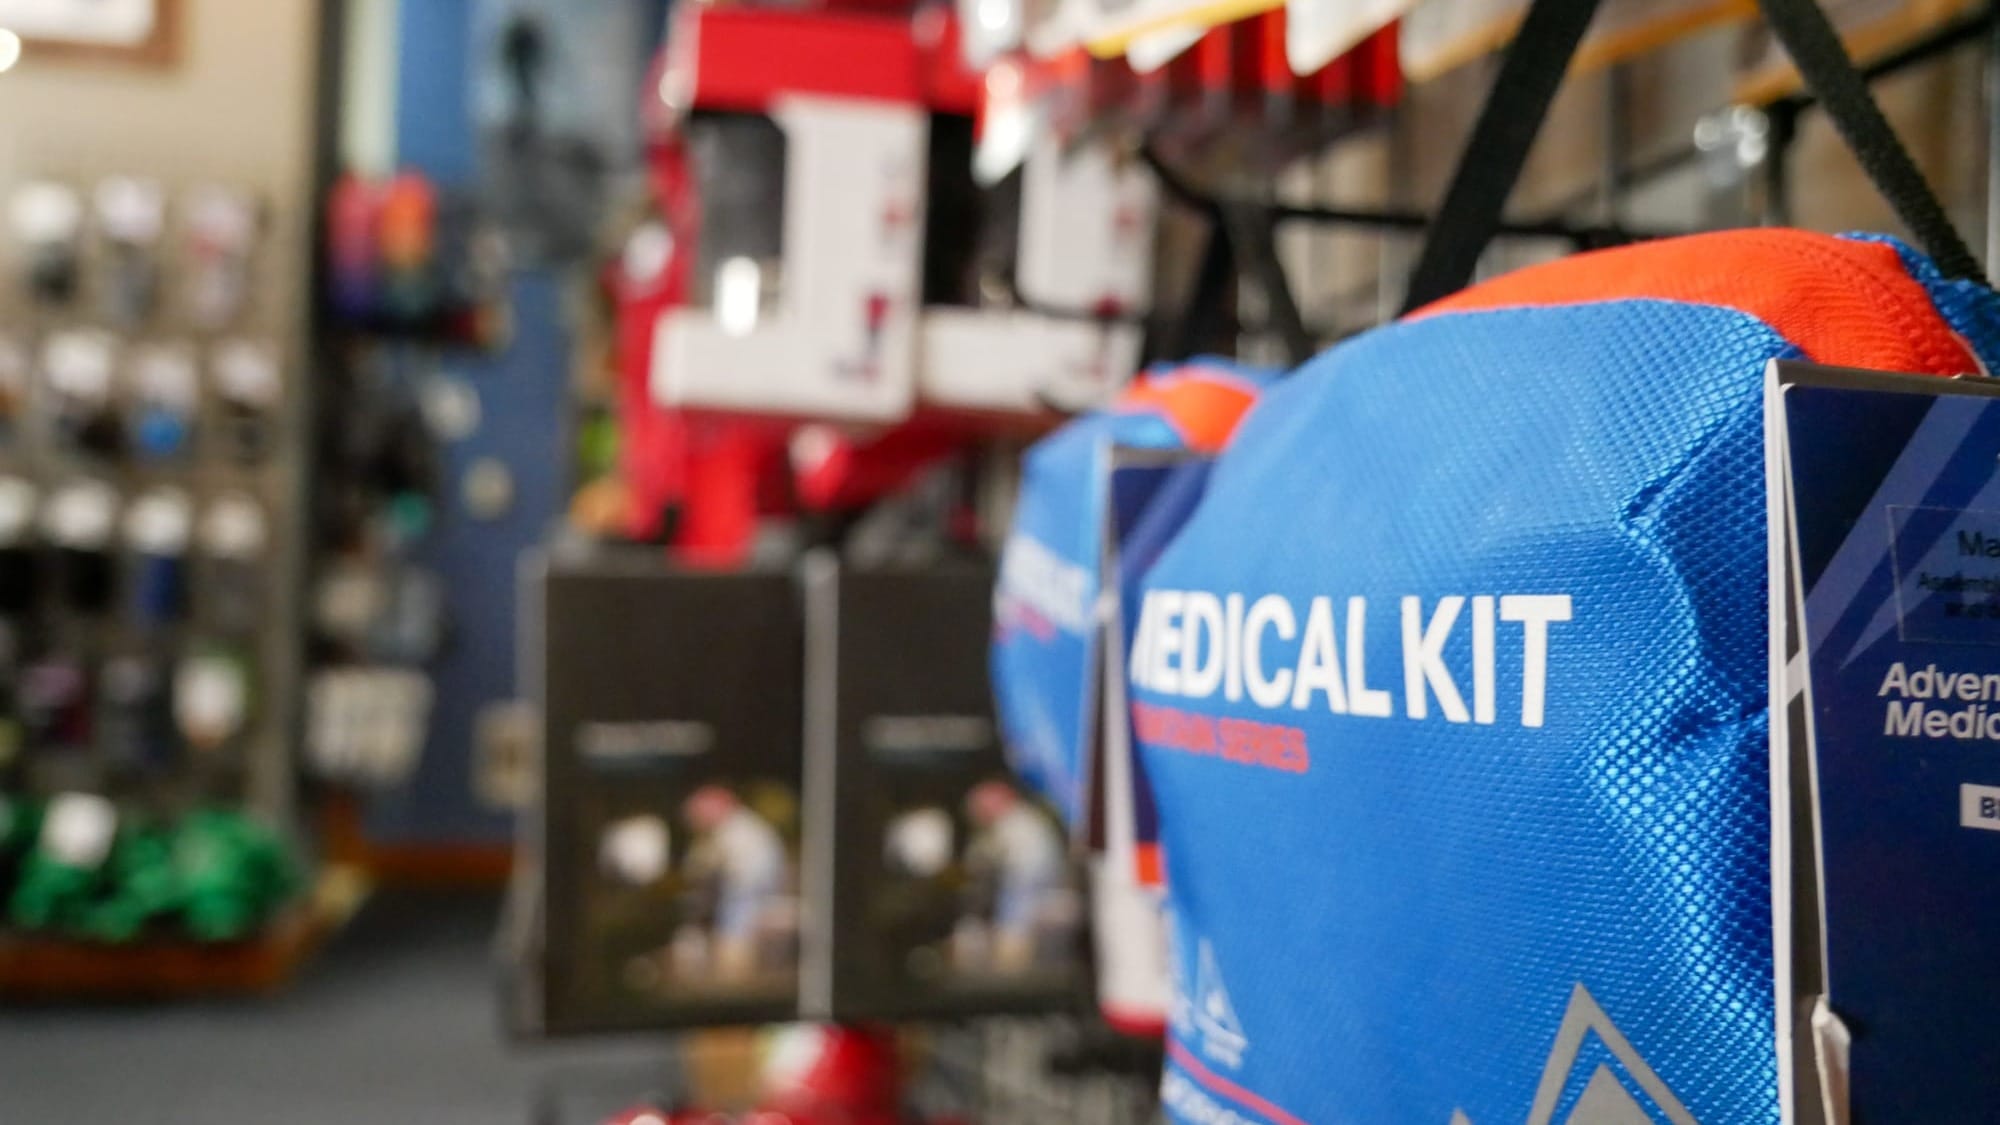
Personal First Aid Kits
A personal first aid kit is crucial for addressing minor injuries and common ailments during your Rainier expedition. Your kit should include adhesive bandages, antiseptic wipes, blister treatment, pain relievers, and any personal medications. Customize your kit based on your medical needs and ensure it’s easily accessible. Having a well-stocked first aid kit allows you to handle minor issues promptly, preventing them from becoming serious problems.
Group First Aid Kits*
In addition to your personal kit, you should carry a group first aid kit. This comprehensive kit includes a broader range of medical supplies for more serious injuries and emergencies. If you're climbing with RMI, this will be carried by your guides. A group first aid kit should contain enough items to address multiple injuries across the group. Familiarize yourself with the location and contents of the group kit so you know where to find it in an emergency. Knowing what’s available in the group kit can help you respond quickly and effectively if a situation arises.
What to include in a Mountaineering Group First Aid Kit
- Adhesive Bandages (Multiple Sizes)
Group Quantity: 20+ assorted bandages - Blister Care (Moleskin, Hydrocolloid Pads)
Group Quantity: 2–3 packs - Antiseptic Wipes
Group Quantity: 15–20 individually packaged - Antibiotic Ointment
Group Quantity: 1–2 medium tubes - Gauze Pads (2x2, 4x4) & Sterile Dressing
Group Quantity: 10+ pads - Medical Tape
Group Quantity: 2–3 rolls (1" width) - Nonstick Sterile Pads
Group Quantity: 5–6 pads - Pain Relief Medication (e.g., Ibuprofen, Acetaminophen)
Group Quantity: Sufficient quantity for the group - Anti-Diarrheal Medication (e.g., Loperamide)
Group Quantity: Extra supply for all team members - Antihistamines (e.g., Diphenhydramine)
Group Quantity: Enough for the entire group - Altitude Sickness Medication (e.g., Diamox)
Group Quantity: Enough for group members who anticipate altitude issues - Prescription Medications
Group Quantity: Each group member’s personal meds + 1–2 spare days if possible - Emergency Steroid / Dexamethasone (Rx only)
Group Quantity: 1–2 vials or auto-injectors (if you have advanced medical training) - Disposable Gloves (Nitrile Preferred)
Group Quantity: 4–6 pairs - Tweezers
Group Quantity: 1–2 pairs - Irrigation Syringe (10–20 ml)
Group Quantity: 1–2 syringes - Wound Closure Strips (Steri-Strips)
Group Quantity: 1–2 packs (10+ strips each) - Triangular Bandage
Group Quantity: 2 or more - SAM Splint or Moldable Splint
Group Quantity: 1–2 (depending on group size) - Oral Rehydration Salts (ORS)
Group Quantity: 4–6 packets - Burn Care Gel/Dressings
Group Quantity: 2–3 packets or 1 medium tube - Chemical Hand/Foot Warmers
Group Quantity: 5–6 pairs - Emergency Blanket (Mylar/Reflective)
Group Quantity: 2–3 - Pocket CPR Mask / Face Shield
Group Quantity: 1–2 masks - Low-Temperature Thermometer (Hypothermia)
Group Quantity: 1 per group (if advanced training available) - Eye Drops (Lubricating / Antibiotic)
Group Quantity: 1 small bottle - EpiPen / Epinephrine Auto-Injector
Group Quantity: 1–2 (if traveling with anyone who has severe allergies) - Safety Pins / Binder Clips
Group Quantity: 5–10
Emergency Communication Devices
While there is ample cell service at Camp Muir and on top of Rainier, that may not always be the case depending on which route you are attempting.
If you're climbing with RMI, your guides will carry long-range radios to communicate with Basecamp and other devices such as Garmin InReach for reliable communication in remote areas. These devices are used to stay in contact with the RMI office and emergency services if necessary but are worth bringing personally if you want to keep in touch with friends and family. Ensure you know the protocols for using these devices and communicate any emergencies promptly. Reliable communication means can be a lifeline in critical situations, providing access to emergency response if needed.
Hydration & Food Storage
Cookware & Cutlery
Proper cookware and cutlery are essential for preparing and consuming meals efficiently during your Denali expedition. Bring a durable, lightweight bowl, an insulated mug, and a reliable spoon or spork. Insulated mugs are handy for keeping beverages warm in cold conditions. Ensure your utensils are made of materials that can withstand harsh conditions and are easy to clean. Having practical and functional cookware helps you maintain energy levels with hot meals and drinks, which is crucial for your overall performance and comfort.
Water Bottles
Staying hydrated is critical for performance and acclimatization. Bring at least 2 liters of water (wide-mouth Nalgene-style recommended) to ensure adequate water intake throughout the climb.
While two 1 liter wide-mouth water bottles work well, a single 1.5 liter and another 0.5 liter water bottle provide more options for water-bottle use, such as warm drinks in the small bottle.
Wide Mouth water bottles are also preferred to narrow-mouth, as they are less likely to ice up and prevent you from getting that H2O!
Stuff Sacks, Storage & Organization
Keeping your gear organized and dry is essential for a stress-free climb. Stuff sacks and dry bags allow for easy separation of gear inside your pack, while large garbage bags provide a lightweight, effective way to waterproof belongings.
Gear Organization Tips
- Use color-coded stuff sacks for quick identification
- Keep your sleeping bag in a waterproof compression sack
- Store extra layers and gloves in a dry bag for quick access
Multi-Use Tools & Accessories
Pocket Knife or Multi-Tool
A pocketknife or multi-tool is essential for gear repairs, food prep, and small adjustments. A lightweight, reliable lighter should also be carried for stove operation and emergency fire-starting.
Lighter*
A lighter is essential for starting stoves and fires. Bring a durable, windproof lighter that functions well in cold conditions. It’s also wise to have a backup lighter or waterproof matches in an emergency. A reliable lighter ensures you can prepare meals, boil water, and stay warm when needed.
GPS Watches or Altimeters
An activity tracking watch helps monitor your physical condition and manage your daily schedule. Choose a watch that tracks altitude, heart rate, and other vital metrics. Features such as GPS, weather updates, and long battery life are also beneficial. An activity tracking watch provides valuable data that helps you pace yourself and stay informed about your environment.
Toiletries & Personal Care
Sunscreen
Sunscreen protects your skin from the intense UV rays at high altitudes. Choose a broad-spectrum sunscreen with an SPF of 50 or higher. Apply it generously to all exposed skin, including your face, neck, and ears. Reapply throughout the day, especially if you’re sweating or in contact with snow. Protecting your skin from sunburn prevents discomfort and reduces the risk of more severe long-term damage.
Lip Balm
High altitudes and cold temperatures can quickly dry out your lips. Carry a high-SPF lip balm to prevent chapping and protect against sunburn. Apply it frequently to keep your lips moisturized and protected. Lip balm with added sun protection is especially important to shield the delicate skin of your lips from UV rays.
Moisturizer
Cold, dry air can damage your skin. Bring a good-quality moisturizer to apply to your face and hands, helping to prevent dryness and cracking. Choose a product that is effective but non-greasy, ensuring it absorbs quickly and doesn’t interfere with other layers of protection, such as sunscreen.
Spare Contact Lenses or Eyeglasses
If you wear contact lenses or glasses, bringing spares is crucial. The harsh conditions can irritate your eyes, and having backup pairs ensures you won’t be impaired if your primary lenses or glasses are lost or damaged. Consider daily disposable lenses to reduce the need for cleaning solutions, or bring a compact cleaning kit if using reusable lenses.
Ear Plugs
Ear plugs can be a lifesaver for getting a good night’s sleep in a noisy camp environment. Whether the sound of the wind, snoring tent mates, or other disturbances, ear plugs help you rest better and stay refreshed. Choose comfortable, high-quality earplugs that block out noise effectively.
Chemical Hand Warmers
Chemical hand warmers provide a quick and convenient way to warm your hands in extreme cold. They are easy to activate and can be placed inside gloves or pockets. Carry several pairs to use during breaks or when the temperature drops significantly. Keeping your hands warm is crucial for dexterity and comfort.
Pee Funnel for Women
A pee funnel allows women to urinate standing up, which can be more convenient and sanitary in cold and challenging conditions. Choose a funnel that is easy to use and practice with it before the expedition. A pee funnel can make bathroom breaks quicker and more comfortable, especially in harsh weather.
Electronics
During downtime at camp, having a book, journal, or e-reader can help pass the time—particularly if waiting out a storm. A power bank or solar charger ensures that critical devices remain charged throughout the climb.
Camera
Capturing the breathtaking scenery and memorable moments of your Denali expedition is essential. Bring a durable, high-quality camera that can withstand cold temperatures and rugged conditions. Ensure you have enough memory cards and batteries, as the cold can drain battery life quickly. Practice using your camera with gloves on to ensure you can operate it easily in the field. A good camera helps you document your journey and share your experiences with others.
Power Bank
A power bank is indispensable for keeping your electronic devices charged during the expedition. Choose a high-capacity, rugged power bank that can handle extreme conditions. Ensure it has multiple USB ports to charge various devices simultaneously. A reliable power bank ensures your camera, GPS, and other essential electronics remain functional throughout the climb.
Documents*
Passport and/or Visa
A valid passport is essential for entry into the United States for international climbers. Please make sure that your passport is up-to-date and will remain valid for the duration of your trip. Depending on your country of origin, you may also need a visa. Check the visa requirements well and obtain the necessary documents to avoid any last-minute issues.
Climbing Permits
Climbing Mount Rainier requires specific permits, which the National Park Service manages. Ensure that you have all the permits necessary for your expedition. Your guide service will typically assist with this process, but confirming that all documentation is in place before you depart is crucial. Keep copies of your permits with you and easily accessible.
Medical Information
Carry a detailed list of your medical information, including any conditions, allergies, and medications. This information should be easily accessible to your guides in an emergency. Include copies of your Physician’s Certificate and any other relevant medical documents. Having this information readily available ensures that you receive appropriate care if needed.
Emergency Contact Information
Ensure you have a list of emergency contact numbers, including family members, friends, and your insurance provider. This list should be easily accessible and shared with your guides. In an emergency, having clear contact information helps facilitate communication and ensures that your loved ones are informed.


